
Before you begin
I highly recommend having the shield removed from the Arduino while programming (or at the very least not having the ink head in the carrier). I have seen the Arduino outputs pulse randomly during programming which could damage you ink head (if they exceed the 5μs pulse size).
Vin jumper
If you have the Vin jumper on I suggest you do not have the Arduino powered solely from the USB port. The boost converter could pull too much power through the Arduino and cause damage. You could optionally replace the Vin jumper connector with a diode if you always plan to power the Arduino from the Shield and never the Shield from the Arudino (i.e. not using the Barrel jack on the Arduino to power them both).
Jumper configurations
You can use any combination you want however you should always have all the ABCD jumpers on the same spot (i.e. NOT 2 on the A0A3 and 2 on the A2A5 connections). You should also never connect more then one pulse jumper on a single shield. Either of these configurations could damage your Arduino.
Download and “install” the libraries
Visit https://github.com/NicholasCLewis/InkShield for the latest Arduino library. There is a folder there called “ArduinoLibraries.” The folders contained here should be downloaded and copied into your “Arduino/Libraries” folder. Once that is completed you should see the three Inkshield menu items in you File/Examples/ menu. If you are using your shield on a regular Arduinio you can use the InkShield or InkShieldLite examples. If you are using your shield on an Arduinio Mega you can use the InkShieldMega or InkShieldLite examples.
Open the basic example
The most basic setup will be MinimalInkShield example:
/*
 *  MinimalInkShield.pde - Basic InkShield sketch
 *  Oct 1, 2011, Nicholas C Lewis, Creative Commons Attribution-ShareAlike 3.0
...
 */

#include <InkShield.h>

//initialize shield on pin 2
InkShieldA0A3 MyInkShield(2);
//For shields set to A2A5 use InkShieldA2A5 to initialize instead of InkShieldA0A3
//InkShieldA2A5 MyInkShield(2);

void setup() {
//nothing to setup
}

void loop() {
  //spray all 12 nozzles as fast as possible
  //(blackout pattern 0x0FFF = 0000111111111111)
  MyInkShield.spray_ink(0x0FFF);

  //or other patterns
  //(every other nozzle 0x0AAA = 0000101010101010)
  //MyInkShield.spray_ink(0x0AAA);
  //(every other nozzle 0x0555 = 0000010101010101)
  //MyInkShield.spray_ink(0x0555);
}
To use this example as-is setup the shield as shown below (ABCD = A0A3, Pulse = 2):
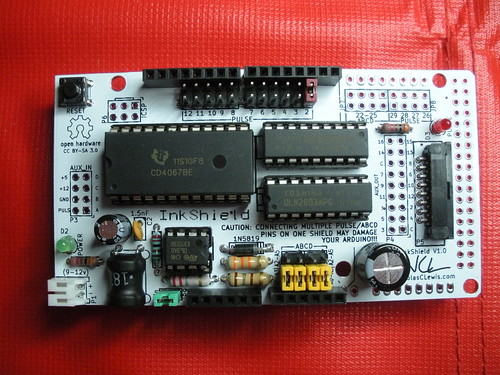
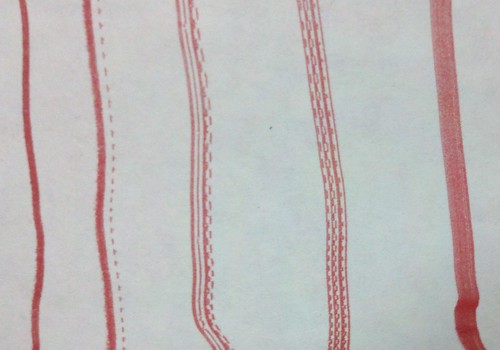
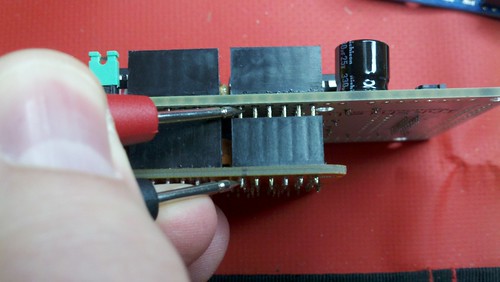
When running “MinimalInkShield” you should get output as seen on the far right (a solid ~0.125″ wide band of ink). If you get any of the other patterns you have an ABCD pin not connecting to the Arduino. Disconnect the power immediately and check continuity as shown below. If you continuously run the head in this condition you can burn out a nozzle.
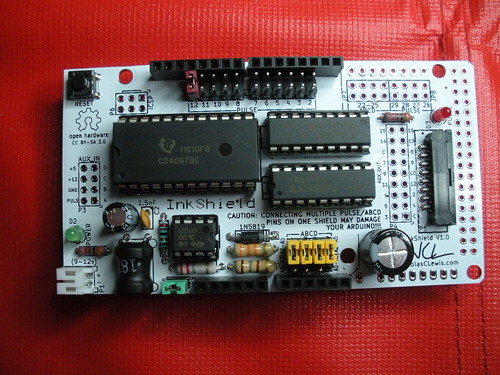
If you wanted to use the shield on A2-A5 and 12 then you would update the code as shown:
InkShieldA2A5 MyInkShield(12);
And you would switch the ABCD jumpers to the A2A5 position and the pulse jumper to 12 as shown below:
Multiple shield setup
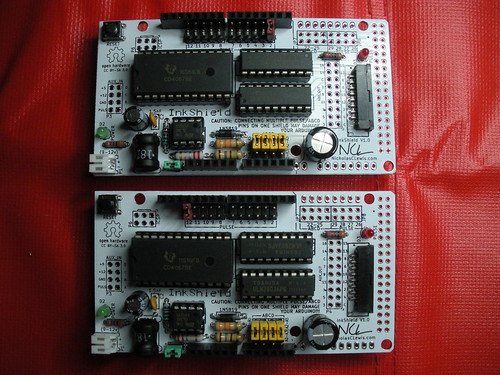
If you want to connect multiple shields to a single Arudino they should have the same ABCD pins and each have a unique Pulse pin as shown (both ABCD = A2A5, Shield1 Pulse = 2, Shield2 Pulse = 12):
You would then use a version of the MultiInkShield.pde example (NOTE: this code is slightly changed from the example in the folder as different pins are used).
#include <InkShield.h>

//initialize shields on pins 2 & 12
//(this currently does not work for more than two shields - NEED TO FIX)
byte pins[]={2,12};
//For shields set to A2A5 use InkShieldA2A5 to initialize instead of InkShieldA0A3
InkShieldA2A5 MyInkShield(pins);

void setup() {
  //nothing to setup
}

void loop() {
  //spray all 12 nozzles as fast as possible (blackout pattern)
  //with multiple shields this call will spray ink from the first shield (on pin 2 in this case)
  MyInkShield.spray_ink(0x0FFF); //first shield (on pin 2)
  //these calls will always work for single or multi shields (and will only spray ink if that pin was init above)
  MyInkShield.spray_ink12(0x0FFF); //shield on pin 12
}
Note that in all of these examples the line:
#include <InkShield.h>
is for the regular Arduino and if you are using the Mega examples it will read:
#include <InkShieldMega.h>
The Lite library
The downside to the Arduino and Mega libraries is that to support switching the outputs fast enough for the ink head requires that the library include functions for every possible pin combination. This leads to a rather large library and if you are doing a lot of other programming to go with the ink spraying you may run out of room. The solution to this is the Lite library which has only very simple routines for pulsing the outputs and requires that your code includes the timing to protect the nozzles from burnout.
/*
 *  MinimalInkShieldLite.pde - Basic InkShield sketch (for Arduino and Arduino Mega)
 *  Copyright 2011, Nicholas C Lewis, GNU Lesser General Public License
 ...
 */
//this library will work with both Arduino and Arduino Mega
#include <InkShieldLite.h>

//initialize shield on pin 2
const byte pulsePin = 2;

void setup() {
  setABCDPinMode(abcdA0A3, OUTPUT);  //set the abcd pins as outputs
  pinMode(pulsePin, OUTPUT);         //set the pulse pin as output
}

void loop() {
  //spray all 12 nozzles as fast as possible
  //(blackout pattern 0x0FFF = 0000111111111111)
  spray_ink(0x0FFF);
}

void spray_ink(word strip)
{
  //loop thru the strip
  for(byte i = 0; i <= 11; i++){
    if(strip & 1<<i){
      fastABCDDigitalWrite(abcdA0A3, i, HIGH);  //set abcd (nozzle address)
      fastDigitalWrite(pulsePin, HIGH); delayMicroseconds(5);  //pulse pin high, wait 5us
      fastDigitalWrite(pulsePin, LOW); //pulse pin low
      fastABCDDigitalWrite(abcdA0A3, i, LOW); //reset abcd
    }
  }
  //wait to be sure we don't try to fire nozzles too fast and burn them out
  delayMicroseconds(800);
}
The difference here is that your code MUST include the spray_ink function. The library includes setABCDPinMode, fastABCDDigitalWrite, and fastDigitalWrite. This version is much lighter on resources, allows ANY pins to be used for the ABCD and Pulse, and could support other boards (with additional pin mapping added to the library header file).
The one exception the the above mentioned use of any pins for ABCD is that they must be sequential and on the same port (i.e. PORTA, PORTB, etc…). setABCDPinMode(abcdA0A3, OUTPUT); takes a single pin abcdA0A3 as input and sets it and the next four pins in the port as output pins. fastABCDDigitalWrite(abcdA0A3, i, HIGH); takes a single pin abcdA0A3 as input and sets it and the next four pins in the port to the value i.